So, you've got your new design plans sorted and bought all of the materials that you need for your new floor, all that's left is to lay your slabs. Of course, the easiest option to choose is to hire an installer to lay them for you, but if you're running on a tighter budget and want to install them yourself, there may be some questions you're asking yourself. How long does it take? What do you lay patio slabs on? Well, here's what you're going to need to do!
First things first, you're going to want to make sure that you have all the tools and materials sorted. Here's a list to double-check you have everything in place.
Tools Needed to Lay Patio Tiles
- Trowel
- Rake
- Wheelbarrow
- Rubber mallet
- Shovel
- Tape measure
- String line and pegs (optional)
- Cement mixer (optional)
Materials
- Paving slabs
- Sand (sharp)
- Cement
- Sub-base aggregate
Step-by-Step Guide to Laying Patio Tiles
Prepping the area
Before you can even think about laying your new paving slabs, you will first need to prepare your patio area. Here, you will need to dig a depth of around 150mm across the whole area where your patio will be, ensuring the soil is evenly compacted. Once this has been done, you can begin to tip the sub-base in, raking it into a consistent depth of 100mm. You need to make sure that it is smooth, flat and firm.
Getting the concrete ready
Next, you'll need to create a concrete mix of three parts sand and one part cement, adding water to create a dough-like consistency. To do this, you can either use a cement mixer or a target bucket. Once done, to check that the mix is thick enough, pick some up and mould into a ball. When you let go, it should keep its shape without water oozing out of it or falling apart. Ensure you have mixed enough concrete to make an even 40mm layer in the patio bed.
Laying the patio slabs
Before you can begin to lay your slabs, it's important to dampen them so they don't dry out your concrete too quickly. Once this is done, you can lay your first slab. Slowly lower your slab in position into the concrete mix and gently tap it with a rubber mallet in order to fix it into place. In ideal terms, you'll want your slabs to sit around 15mm into the mortar. Repeat this process with the remaining slabs, leaving a 10-15mm gap between each one until your patio bed is covered. After all of your slabs are laid, spray the entire areas with water until it's completely saturated and leave it to set for a minimum of 24 hours.
Finishing touches
The last part of laying your slabs involves applying the finishing touches. Here, use a trowel to fill the gaps between your slabs with a suitable grout, ensuring that no residue is left on the patio's surface. Clean away any other mess that may be laying on top of your slabs and leave to set.
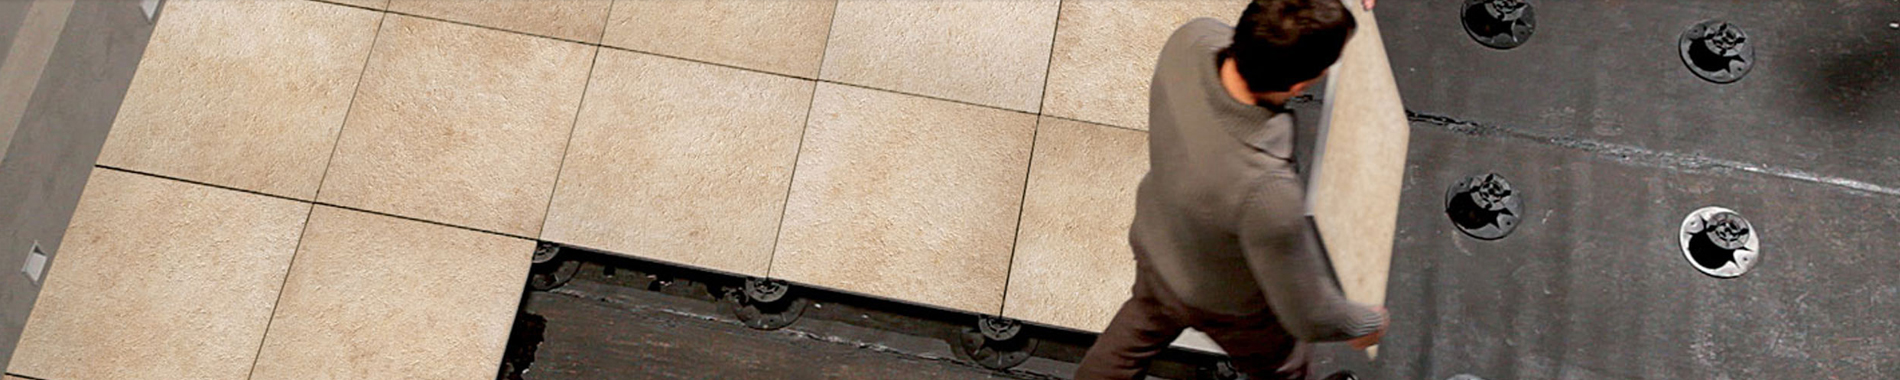
Dry-Installing Your Paving Slabs
The above method is what is traditionally used by the majority of patio installers. However, thanks to PrimaPorcelain's revolutionary pedestal support system, you are able to make the installation process even easier, with no mess whatsoever - laying patio tiles has never been easier! Eliminate the need for traditional adhesives and mortar such as cement and lay your slabs onto our state-of-the-art pedestals.
Here, your slabs can be laid immediately, with absolutely no drying-out time needed! You can even run any necessary cables and wires underneath if you have any special features in your garden - perfect! One of the great things about our pedestal supports is that if you ever feel like moving your slabs, all you need to do is simply lift them up and relocate without having to dig them up. You can find out more about our pedestal support system below.
Pedestal Support System >
For more information on how to lay patio tiles or what you should lay your patio slabs on, please do not hesitate to get in touch with a member of the PrimaPorcelain team today by calling 02920 803756 or emailing us at info@primaporcelain.co.uk.